There's something about springtime that's pure magic. Flowers bursting into bloom. The scent of a gentle rainfall. The excitement of kids putting away their winter coats, donning their rain boots, and splashing in puddles. While it may not be time for summer break quite yet, the following activity is the perfect way to bring the magic of springtime into your classroom.
You and your students will have so much fun learning about the parts of a flower with two variations of the same activity, outlined below. Children will love touching, labeling, cutting, and even pulling apart the different flower segments! This activity is ideal for fourth and fifth grades.
To complete either version of the "Parts of a Flower" activity, you'll need a few simple materials to get started:

Flower Dissection
In this version of the activity, students will dissect and sort the parts of a flower, gluing them onto a brightly colored sheet of paper and labeling them in a colorful diagram.
First, students will choose a brightly colored piece of paper on which they'll spread out their flower pieces. Then they'll use scissors to cut apart their flowers. You may want your students to reference this Flower Anatomy Poster from Super Teacher Worksheets. They can also cut out the labels from the flower anatomy poster to use for their project. Otherwise, they can label the flower parts with a pen or pencil.
Once all the flower parts have been cut and sorted onto the paper, students will glue them down and label them. The finished project will look like this:

In this alternative version of the activity, students will keep their flowers intact, gluing them onto brightly colored paper and affixing each part with a label.
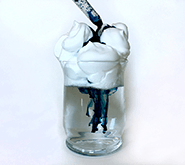
First, students will lay down their flower against a brightly colored piece of paper and flatten it gently with their hands. Then they will glue the flower to the paper. If necessary, students may remove some petals to create a cross-section of their flower, as shown in our picture below, so that the inside parts of the flower can be seen too.
(Teacher Tip: If your students' labels are affixed directly onto the flower itself, then regular glue may not be strong enough. You may want to assist your students by using hot glue instead.)
If it's too difficult to access some of the innermost parts of the flower without tearing it, we recommend labeling only the visible parts, or removing a piece (such as the flower's stamen, pictured below) and labeling it apart from the flower.
Here's what the finished project should look like:

What kinds of hands-on activities have you done with your students while teaching the parts of a flower? Did you use real flowers or fake ones? How did you make your flower activity "grade level" appropriate? We'd love to hear from you, so drop us a line in the comment section below!
If you're looking from more botanical worksheets to bring the magic of nature into your classroom this spring, check out the Super Teacher Worksheets Plant Activities page!
You may also like: