One of the secrets of the exceptional teacher is his or her ability to recognize teachable moments in the classroom. You know, the ones that aren't in "today's curriculum." I can think of no better example than the upcoming Thanksgiving holiday. Thanksgiving is a wonderful time for teachers to incorporate lessons on gratitude into classroom time. With this in mind, we've put together some simple, meaningful Thanksgiving crafts for children. All you'll need is a little bit of creativity and a few craft supplies, and you can serve up a lesson on thankfulness with the mashed potatoes and gravy.
What you'll need:
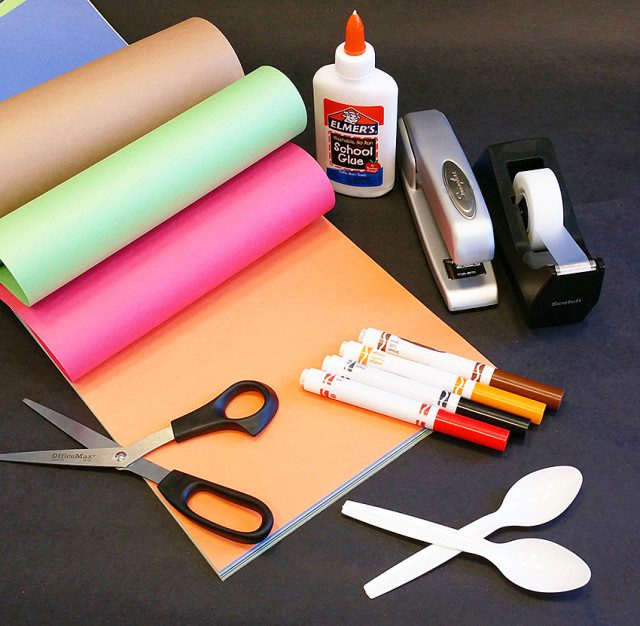
2. scissors
3. markers
4. Elmer's glue
5. tape
6. white plastic spoons
7. stapler
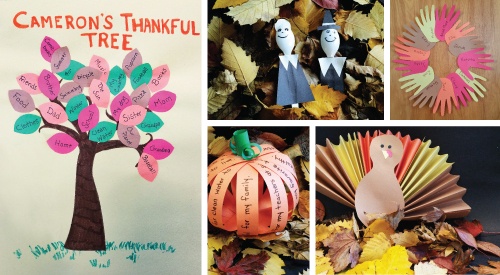
Thankful Tree
This project is so cute and simple! Make sure you have fall-colored construction paper (red, orange, green, and brown), as well as scissors, markers, and glue. Here's what to do:
1. Provide each child with one piece of yellow construction paper.
2. Have each child draw a tree trunk on their paper.
3. Have the students cut seven leaves from each color. The easiest way to do this is to provide each student with a leaf stencil to trace and cut around. (You can prepare these ahead of time.)
4. Glue the leaves to the top of the tree.
5. Have your students write a word or two in each leaf to describe something they are thankful for. They can write their name on the top of the paper.
Folding Feathers Turkey
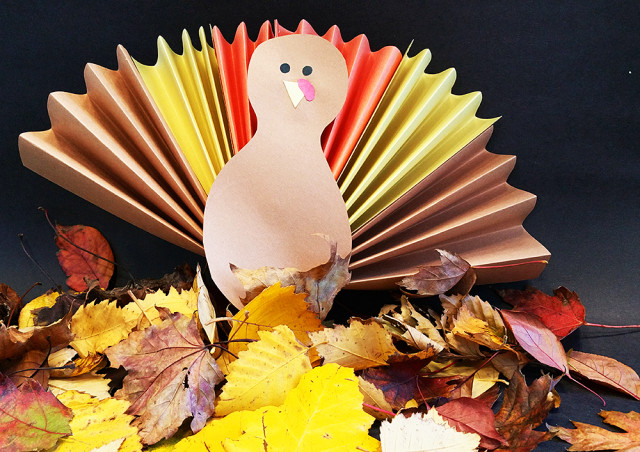
1. Give each child 3 pieces of brown paper, 3 pieces of yellow, 2 pieces of orange, and 1 piece of red.
2. Fold 2 brown pieces, 2 yellow pieces, and 2 orange pieces in a zigzag pattern.
3. Staple three folded pieces together (brown, yellow, orange) and the other three folded pieces together. Wrap the base of the "fan" with tape to adhere the two parts together.
4. Cut a turkey body shape from the remaining brown piece. Cut a triangular beak from the yellow paper and a "gobbler" from the red paper. Glue these pieces onto the turkey's body. Add eyes with a marker.
5. Adhere the turkey's body to the folded feathers with tape. Your Thanksgiving turkey is ready!
Pilgrim Spoon Puppets
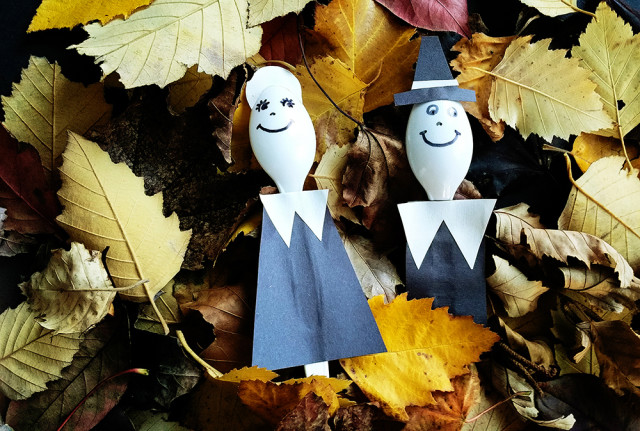
1. Provide each child with two plastic spoons, one piece each of black and white construction paper, a marker, a pair of scissors, and glue.
2. Draw a smiley face on the spoon.
3. Cut out black shapes for the Pilgrim boy's clothing, and white pieces for his collar and hat. (Refer to picture.) Glue these onto the first spoon.
4. Cut out black shapes for the Pilgrim girl's clothing, and white pieces for her collar and bonnet. Glue these onto the second spoon.
5. Give the spoons enough time to dry. Let the Thanksgiving theater begin!
Thankful Pumpkin
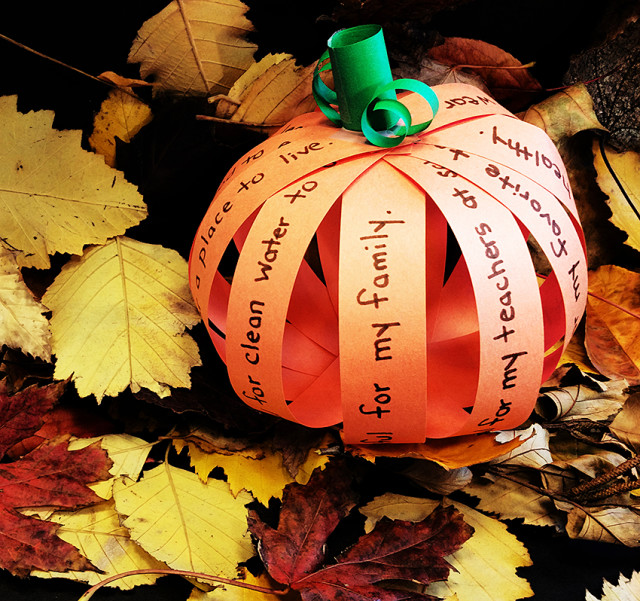
Create this adorable Thanksgiving pumpkin as a reminder to be thankful. Make sure you have access to the following materials for this craft: orange and green construction paper; tape; stapler; scissors; and markers. Follow these instructions:
1. Cut the orange piece of paper into eleven 1-inch strips, using a ruler or a paper cutter.
2. On each strip, students use a marker to describe something they are thankful for.
3. Fan out all eleven strips of paper so that one end of each strip meets the others in the middle, like a flower. Carefully staple the center of this "flower" to join the pieces together.
4. Gather up the opposite ends of the strips and pull them in, so that they form a spherical shape. Staple these ends together at the top, just like you did with the other ends to form the bottom.
5. Finally, cut and roll a small strip of the green construction paper, fasten with tape, and adhere to the top of the pumpkin. Add curly pumpkin vines too! Now your students will have their own fall centerpiece for the kids' table on Turkey Day!
Autumn Wreath
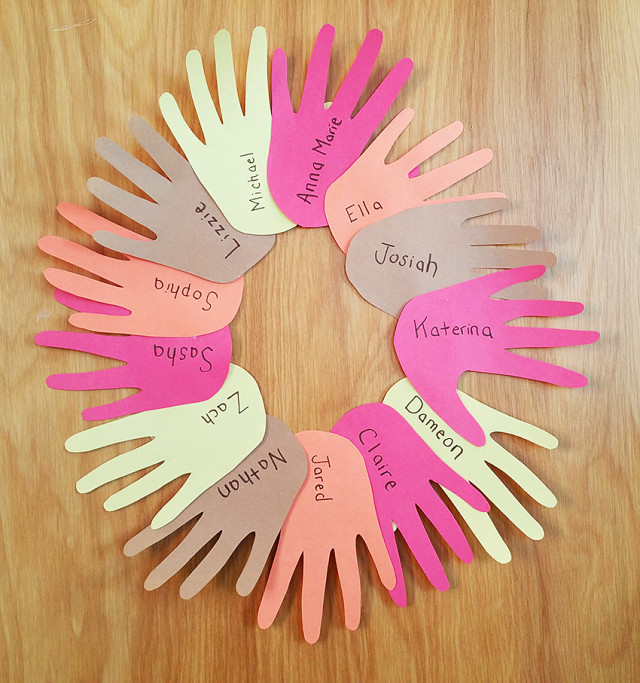
Decorate your classroom door with this cute fall wreath, with leaves made from your students' hand shapes! Here's what you'll need for this project: fall-colored construction paper (red, yellow, orange, and brown); pencils; markers; scissors; and tape. This craft is a breeze! Here are the steps:
1. Provide each student with a piece of construction paper. Try to mix up the fall colors among your students.
2. Ask each child to trace his or her hand with a pencil. Then have the children cut out the hand shape with scissors.
3. Students write their name on their paper hand, and give them to the teacher.
4. Arrange the hand cut-outs in a circular shape, and adhere them together with a small piece of tape on each one to form a wreath. Now your classroom door is Thanksgiving-ready!
These crafts, though simple, are great opportunities to teach your students about remembering the good things in our lives. It's a lesson that never grows old, and if it means setting aside some classroom time to bring out the markers and glue, you can be sure this lesson will remain long after the pumpkin pie is gone.
For more Thanksgiving activities and crafts, check out the Thanksgiving page on Super Teacher Worksheets! Be sure to let us know if you tried any of these Thanksgiving crafts with your students in the comments section below!


